Sunday, January 31, 2010

Homemade Peanut Butter Cups


This is what I made the other day. I got it from Nourishing Gourmet's blog. I've made it before, and they don't stick around too long because they're so tasty. There's a lovely picture of this tasty treat on her blog.

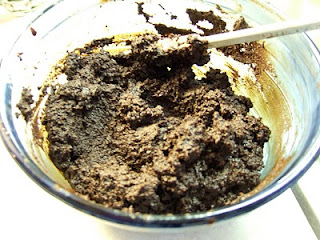
Except this time, I had some cashew and almond butters to use up, so I used that instead of peanut butter. Since they didn't have salt in them, I added about 1/2 tsp. salt to the nut mixture. I didn't add any chopped nuts. And since I didn't have anymore unsweetened chocolate (I used it all up making my flourless chocolate cake), I used cocoa powder instead, in a ratio of 3 Tbsp. powder to 1 Tbsp. coconut oil. A good excuse to use more of healthy fat. Also, because my chocolate mixture was especially thick, I ended up patting down scoops of chocolate in each cup with my finger.

Everything between the lines is entirely from the Nourishing Gourmet. Just want to give credit where credit's due!
_______________________________________________________
Homemade, Healthier Peanut Butter Cups

If you use another nut butter, you may need to add more honey. Peanuts are naturally sweet. For that matter, this is definitely a “to your own taste” recipe! And you can easily adjust the sweeter to satisfy you.

  • 3/4 cup of peanut butter, toasted and salted (or use nut butter of your choice)
  • 2 tablespoons honey
  • 1 teaspoon vanilla (if you are making this gluten free, make sure to use gluten free vanilla)
  • 1/4 cup of coconut oil
  • 1/3 cup of chopped soaked and dehydrated nuts, or toasted (I used a mixture of chopped almonds and pumpkin seeds) *
  • 4 ounces of unsweetened chocolate
  • 2-4 tablespoons honey *

1-In a small bowl combine the peanut butter, coconut oil, vanilla, first two tablespoons honey, and nuts. Mix until well combined.

2-Drop by the heaping teaspoon into mini cupcake pans. Place in freezer.

3-Chop chocolate into small pieces and place in the top of a double broiler (or, like I do, in a heat proof bowl that fits on top of a pot you have). Mix in the honey. Bring about two inches of water to a boil in the pot and place the bowl on top. Watch the chocolate carefully so that it doesn’t burn, stirring gently while the chocolate melts. When there are just a few chunks left in the chocolate, take off of the heat and allow it to melt completely.

4-Drop by the teaspoon over the peanut butter mixture and place back into the freezer. Freeze for 20 minutes. Take out, and using a butter knife pop them out. Keep in the freezer or refrigerator and enjoy!

*To toast the nuts, place in a dry pan over medium-high heat. Stir almost continually until they are starting to brown. Take off of the heat.

*I used only one tablespoon honey to sweet the chocolate, but we decided that it needed to be sweeter! So I have put two to four tablespoons, depending on how sweet you want it to be.

________________________________________________________

A note about using coconut oil--This is an instance where coconut oil would probably work best. But if you don't have that, you could also use melted butter, that would probably be next best. I'm not sure how well olive oil would work.

All I have to say about this is YUM!

Thursday, January 28, 2010

Kombucha--A tasty brew

Kombucha... what is THAT?!

"The Kombucha Culture, sometimes mistakenly referred to as a mushroom, is a symbiotic, probiotic colony of yeast and bacteria (the friendly type). Kombucha Tea is made by combining the culture, with a mixture of black tea, and sugar. The ingredients are allowed to 'ferment', usually from 7-10 days. The resulting beverage contains dozens of elements, many of which are known to promote healing for a variety of conditions." [from http://www.kombucha.org/]

The "mushroom", also called a SCOBY (or Symbiotic Colony of Bacteria and Yeasts), eats up the sugar and turns it into something healthy. How cool is that?! So basically, it's a drink that's good for you! And it's super easy to make at home. You can even make your own scoby!

How to make your own scoby:
Buy a 16 oz. bottle of kombucha from the grocery store. Pour it into another jar with a wider lid, like a wide-mouth quart-size jar. Put a breathable cover on the jar. I put a coffee filter on with a rubber band to hold it in place. Let sit on your counter until a layer begins to form on top. It will probably take about 7-10 days till it's ready. We didn't add anything, just let it sit till that scoby formed.
Okay, now that your science experiment is ready :-) you can move on to the next part.

How to make your own kombucha tea (the Merseth way):
There are a lot of different ways to make it out there, but I just follow the recipe from Nourishing Traditions Cookbook by Sally Fallon.
3 qts. filtered water
1 c. sugar (preferably organic)
4 tea bags (organic--I'll explain why this is especially important later)
1 scoby
1/2 c. starter culture-- ie, kombucha tea from previous batch (or the tea you used to make your mushroom... I usually use closer to 1 c., just because I want to make sure the tea stays acidic enough so it won't mold.)

1. Boil water.

2. Dissolve sugar in the water.

3. Add tea bags. (I buy loose-leaf tea, and measure it into a coffee filter, and tie it with a twisty tie. That's what you see in my picture. Also it's important to get good organic tea. Here's why, as well as additional info about K-tea's benefits and ways to make it properly. Basically, organic will ensure the viability of your tea... In the beginning, I used tea that wasn't organic and it made my mushroom mold... like fuzzy white stuff! Had to throw it away!) Wait until the tea is room temperature before moving on, otherwise your newly made scoby will be ruined.

4. Pour your brewed tea into a gallon jar. Carefully place your mushroom on top of the tea with the stringy things hanging down, then pour the starter culture gently on top. Cover with a breathable lid, like a dish towel or a coffee filter tied on.

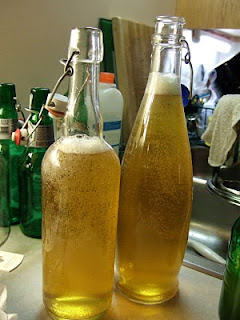
5. Put on a shelf and wait a week. Check the taste by sticking a straw down in the middle of the liquid and drawing it out with your finger on one end and pour the liquid in your mouth. If it's effervescent, with a slight tangy apple juice with a touch of vinegar taste, it's done. Mine usually has to go for 9 days in this colder weather. In warmer weather, it will take less time. Also, if you prefer it less vinegary, brew for less time. Here's a picture of mine after 9 days. See the stringy things? That's part of the scoby.
6. Bottle the liquid, reserving enough for your next batch.
7. We leave our bottled kombucha on the counter for a second ferment for 2-5 days. Gives it more zip. You can also add different flavors to the second ferment. We've put in white grape juice concentrate before. We'll try more in the future. There's lots of websites out there with ideas. Mainly, we like it plain! Also, we use jars like you see in the photo. They're kind of hard to get, and a little spendy. We lucked out and found some for cheap in a store that was closing them out. They had fru fru pop in them. And my husband bought the green jars from a liquor store... imported German beer came in them, and it was cheaper to buy them that way (about $2 a bottle) rather than just buying the bottles themselves! Otherwise, you could use old glass juice bottles or something similar. I prefer glass to plastic. But that's for another post....

With each subsequent batch, new mushrooms will form on top. We have one saved with starter culture in the fridge in case one of our mushrooms goes bad. But you can give these mushrooms to friends, so they can make their own kombucha, too! It's almost like the Amish Friendship bread concept, but way better for you.

I started attempting to make this several years ago, but had trouble with mold. I didn't try again until this past fall 2009, when I finally realized after doing some research, about the importance of organic tea. Since then, we've been going gangbusters. LOVE the stuff. One note of caution. Don't drink too much at first, as it helps to detoxify the body. It's tempting to drink a lot, because it tastes so good. And since I don't drink soda pop, and kombucha is fizzy, it feels like I'm having a fun beverage. Here's a post about using kombucha tea while pregnant or nursing. I drink it, I just don't have more than a glass over the course of a day. Judah loves it--I think he likes the bubbles.

If you're interested in trying this out, I will have some extra scobys coming available soon, so let me know if you'd like one!


Wednesday, January 20, 2010

Andrew is 3 months old!


Three whole months already! Hard to believe. A couple weeks ago I put away Andrew's 0-3 month clothes and brought out the 3-6 month stuff. Already he's filling those out quite nicely.


This isn't the first time Andrew has flipped over during tummy time, but this is the first time I've been able to capture it on my camera.
Taken 1-16-10, He's just over 12 weeks old.
I tried to upload a video of Andrew jabbering, but no success.

Here are a few pictures from Andrew's "3 month photo shoot" that I took on 1/22/10.

Chocolate cake with my new springform pan!


On Monday this week, we entertained some guests from Virginia (Aaron Ferkenstad and his fiance Djem)! And I wanted an excuse (as if I needed one) to use one of my Christmas presents: some springform pans. Those of you who don't know what those are, here's a picture. This kind of pan is usually used for cheesecakes.

Aaanyway, so I chose to make this recipe called Flourless Chocolate Cake. But I made a few modifications. It was delish. I thought it tasted kind of like fudge, it had that type of a consistency. Read on for my version of the cake.

Flourless Chocolate Cake
  • 1/8 c. cocoa powder
  • 4 oz. sweet butter (one stick)
  • 10 oz. unsweetened baker's chocolate
  • 8 eggs, separated
  • 1/2 c. honey
  • Pinch cream of tartar
  • 9 inch springform pan
  1. Heat oven to 275 degrees. Lightly butter the pan and dust with the cocoa powder, shaking off excess.
  2. In a double boiler, melt chocolate and butter until smooth. Remove from heat and quickly beat in egg yolks. (And when they say quickly, they mean QUICKLY, because the eggs make the chocolate mixture thick in a matter of seconds!)
  3. Beat egg whites and cream of tartar until foamy with an electric mixer on high speed. Slowly add honey and beat until medium peaks form when beaters are lifted. Don't overbeat. (I'm not sure what will happen if it does get overbeaten... but here's a picture of what I think are medium peaks...)
  4. In thirds, gently fold egg whites into melted chocolate mixture. Pour into prepared pan and bake for at least 30 minutes, probably more like 40-45. You can test for doneness with a toothpick, but in the end, I went by look and feel. The top shouldn't look wet at all, and it shouldn't feel super squishy in the middle when you lightly touch it.
I thought about frosting it or dusting it with powdered sugar, but never got around to it. I actually didn't think it needed frosting, just a scoop of ice cream. The cake tastes like dark chocolate fudge. It's definitely not very sweet, but just sweet enough, at least for my tastes. If you prefer sweeter desserts, you may want to follow the original recipe which calls for semi-sweet chocolate and white sugar.

I give myself a C for presentation, but an A for taste. I definitely plan to make it again in the future! I especially like that the amount of sugar is minimal, and that there's no flour. And I love eggs' versatility.


Saturday, January 16, 2010

Sourdough bread--Mastering the art...a work in progress

One of my new quests this year has been to try to achieve success at making sourdough bread. It's been a long road of trial and mostly error, and then giving up for a while.

For those of you that think "Bread, what's the big deal? Just add some yeast to some flour and voila!" Not so! In fact, there is no yeast in true sourdough bread.

So what makes it rise? Natural yeasts and lactobacilli (good bacteria) from the sourdough starter. You can buy a starter or you can make your own, which is what I did. I actually made it in 2007, I believe! I made it according to "Nourishing Traditions", where you mix one cup of water to one cup of rye flour in a bowl, and let it sit out in a warm place with a towel covering it. You keep feeding it that same ratio of flour and water every day until you get significant foaming/bubbling action on the surface, and then you know you've caught some wild yeast. Then you're ready to make bread! Well, the first time I tried it I got some dense bricks, which I ate anyway, but wasn't pleased with my attempt. I've tried several times since then with varying degrees of failure. Then I'd freeze the starter for a while until I felt brave enough to try again.

Fast forward to a couple weeks ago, when I thought I'd try it again. This time, I checked out a book specifically about sourdough bread making called "Classic Sourdoughs: A Home Baker's Handbook" by Ed Wood, which I recommend. But even Ed says that you just have to practice until you get the hang of it.

Here's a picture of my most recent success:


It tastes good and has a texture I like. I could even make sandwiches if I wanted to, the bread holds together that well. Most bread I make just crumbles apart. The good texture is probably due to all the white flour I used, I'm embarassed to admit. But I told myself that if this was going to be a flop, I might as well use up the white flour I had in my pantry. I also justified the white flour saying that the 4-hour leavening time with the sourdough culture would help to break it down to help make it a little more nutritious. There's about a cup and a half of whole wheat and the starter is with rye, so there's a little more healthiness involved, too. So, I want to try making bread that includes less white flour and more wheat. I may possibly try making a new sourdough starter with wheat, instead of rye. We'll see where that goes...

I've also made sourdough pancakes, waffles, and hamburger buns, all of which I've been quite pleased with. It's very fun to see how much the dough ferments and rises overnight. That's one thing this hobby requires, though: advance planning!

So, if you're up for a challenge, try making homemade sourdough bread!

Friday, January 15, 2010

Honey, there's a potluck tomorrow...


On Wednesday night at 8pm, my husband said, "Remember, the Ladies Aid is having a potluck at noon at church tomorrow. Are you coming?" Oh fiddlesticks, I forgot about that. What am I going to make? First of all, I really need to go. I'm the vicar's wife. Isn't that like mandatory? Second of all, if I'm going, I need to bring something I can eat (something without soy, and as I plan to explain in a later post, soy is in just about everything and hides under many guises) and I wasn't planning to ask every cook how they made their dish.

So I headed over to the pantry. What do I have... I have some dry red beans. Then I opened up a bean/legume cookbook my husband picked up from who knows where called "If You Don't Know Beans About Beans, Or Even If You Do..." put out by the St. Paul-Ramsey County Nutrition Program in 1983. Since I didn't have all the ingredients from a single recipe, I sort of mixed two recipes together and ta-da! Instant potluck dish.

Well, not so instant. The beans had to soak overnight, and then cook for nearly 2 1/2 hours the next morning. But it wasn't THAT labor intensive, at least not by my standards, and it didn't taste that bad, either. It won't go down in history as the best dish ever, but it's not a dog food dish either.

Salmon Bean Hotdish
  • 2 c. dry red beans (I used those because that's what I had, but you could probably use whatever you have in the pantry)
  • 2 T. whey, lemon juice, or vinegar
  • 1 14.5 oz. can Wild Alaskan Salmon (or a couple cans of tuna if that's what you have)
  • 1 small onion, chopped
  • 1 large carrot, chopped (I used a big handful of baby carrots because that's what I had. If I had celery in the fridge, I would've used that, too.)
  • 3 T. butter or oil
  • 2 T. flour
  • 1 1/2 c. milk
  • 1/2 t. salt (or to taste)
  • dried parsley
  • 1/2 c. Parmesan cheese
  1. Soak beans 12-24 hours in 4-5 c. of water and 2 T. whey. I started soaking them after supper Wed. night and started cooking them in the morning. It takes 2 to 2 1/2 hours, and you have to make sure there's always enough water in the pot.
  2. Towards the end of the bean cook time, saute the onion, carrot, and 1 1/2 T. of butter or oil in a pan, until soft.
  3. In another pot, put 1 1/2 T. butter to melt, then mix in the flour to make a paste. Slowly add the milk, while whisking. Add the salt, some parsley, and the cheese. This sauce will be poured over the beans when done cooking.
  4. Add in the sauteed carrots and onion to the beans and sauce. Add in the salmon. (Note: if the salmon is not deboned, just go thru it and mash with a fork to make sure the big parts of the spine are out. The rest of the bones can just be mashed in with the meat because they're so soft.
  5. If the dish seems too thick, feel free to add in some extra cream or milk.
And that's the dish. I quick put it in my hotdish carrying case, piled the boys into the van, and made it to the church exactly at noon. Whew!


Note about the beans: Soaking them is supposed to help make it more digestible, but I have to be frank with you... I didn't notice much of a difference (ie: GAS problems!). In the future I plan to try sprouting the beans to see if that helps. It will just require a few days more preparation.

Monday, January 11, 2010

Fermented/Soaked Flour Tortillas


Okay, so I promised I'd be posting about the tortillas I made. I got the recipe from another blogger, Kelly the Kitchen Kop. Here's the recipe, with my comments in italics and my own pictures added.

Fermented Tortillas
  • 2 cups flour of choice (I used 100% whole wheat)
  • 1/4 t. baking powder
  • 1/4 c. lard or palm oil (I used lard)
  • Whey (If you don't know what whey is or how to make it, go here. Or you could use lemon juice or apple cider vinegar, which also help to make the flour more digestible, helping you get even more nutrition out of it. Go here for a detailed explanation of why you should soak grains.)
  • 1/2 t. sea salt
Cut the lard into the flour mixture until it resembles coarse corn meal.

Add enough whey to form a soft dough (about 2/3 cup...I used less). Knead this into a ball and cover. Let it rest on the counter overnight or until you get time to make them.

When ready to make them, mix in the salt. (I sprinkle the salt on the counter and knead the salt into the dough. There was a little crusty edge around my dough, so this helped to make the dough all pliable and got rid of the stiffness.)

Cut the dough into 10-12 pieces and roll these into balls. (I make 12... we're going to have more than one, so might as well make them smaller!)


On a well-floured surface, roll out one ball until it is about 1 mm thick. (I have sprouted flour that I used to roll the dough. And basically I just rolled it as thin as I could without it falling apart.)

Place this on a medium/hot dry griddle. (I used cast iron, and it worked great!) When bubbles begin to form on the surface of the tortilla, turn it over and cook for 30 seconds or so.

There should be brown spots forming over the bubbles, but don’t let it burn. Cool each one on a wire rack before storing. Enjoy!


And that's it! I imagine they'd freeze fine, but they don't last long here. Judah (he's 2) thought they were great! I wish I would've thought about making these sooner. The next time we're hosting a meal here, I'm totally making these! Who wants to come over and have a meal with us? :-)

Getting Started


I never thought I'd actually write a blog. There's no way I'm interesting enough! BUT my kids are, and so is the food I make. I started this blog with a post about food. In fact, I got so excited to make my first post about food that I didn't have any type of introductory post. Now here are a few pictures of Judah (2 yrs) and Andrew (2 1/2 months).


Taken on Dec 23, 2009
Andrew is 2 months


Taken Jan 5, 2010


Taken Jan 8, 2010
The boys are wearing their Ohio State gear from the Ohio Grandparents.


Jan 10, 2010
All ready for church!