Ever since we got our hands on some rennet a couple weeks ago, I've been wanting to try my hand at the art of cheesemaking.
Well, I did make cheese, and learned a few things in the process. I figure it can only get better from here! :-)
I followed the process found in "Wild Fermentation" by S. Katz. If you want a more detailed description, I recommend checking out his book. But here's the basic recipe with my comments.
Rennet Cheese
1 gallon whole milk (I used raw)
1 cup yogurt and/or kefir (I used kefir)
3 to 10 drops rennet (I used Malaka Brand, and about 8 drops, which made a very hard cheese)
3 Tablespoons sea salt
1. First you "ripen" the milk by adding the live culture of kefir. It adds flavor and health benefits, but this step is not essential. I poured the milk into a stainless steel pot, added the kefir, and heated it to about 100 degrees. Katz says between 90-110 degrees is okay. Maintain that temperature for 1-2 hours. Once I had it at the right temperature, I wrapped the pot in a towel and set it on my counter.
2. Mix rennet with 1/4 c. water before you add it to the milk. With the milk still around 100 degrees (reheat it if you have to), stir the milk while you add the rennet-water mixture. But stop stirring once you've added it. The milk has to be still while the rennet works its magic. The more rennet you use, the harder the end product. When I do this again, I plan to use fewer drops, like 4 or 5. My cheese was extra squeaky since I used 8. Within 1/2 hour, the milk will coagulate and form a curd, pulling away from the sides of the pot.
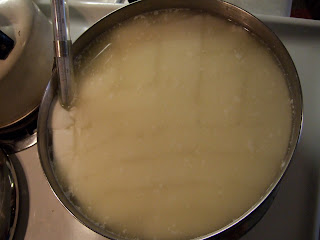
3. Once this coagulation has happened, cut the curd with a long knife into roughly uniform one inch size cubes. You can barely see the gridlines in the photo below. This step provides more surface area for the rennet to work. Be gentle with your cutting, as the curd is fragile and needs to be sliced rather than broken... that's what Katz says, anyway! As you cut curds, keep them moving gently to keep from sinking.
4. Keep it warm at just above body heat temperature for about ten minutes after cutting the curd. Keeping it warmer longer, up to an hour, will make a harder cheese... which is what I did, and helped to contribute to my very firm cheese. Don't increase the temperature fast, because that will result in a crumbly, grainy cheese.
5. Strain and salt cheese. Use a dish towel or cheese cloth over a strainer and pour the cheese/whey into the strainer. Here's where my life got in the way. I should've salted before I strained all the whey off. I poured off some whey so you could see what the curd looked like:

I should've salted at this point, but instead I squeezed out most of the whey before salting it, and let it sit while I took care of crying children:

And so the result was a not very salty cheese in a weird shape. And cheese without salt isn't very tasty, in my opinion. Salt also helps push out the whey, so you're not supposed to be scared to use a lot of salt. Twist the cloth so the cheese is pushed into a ball, and let it drip out remaining liquid.
6. You can serve the cheese young or aged. I didn't age it much, mainly because I'm impatient to eat it. I could've let it form a protective skin to help preserve it, by rewrapping the cheese ball every day with fresh cheesecloth until the cloth is no longer wet from the cheese's moisture, then wrapping it up and putting it in a cool dark place.
I tore my cheese into small chunks like curds. Judah didn't care if they were salty or not, he ate them right up. The longer they sit, they'll develop a richer flavor.

The lessons I learned:
1. Less rennet
2. Add salt sooner
3. Shape the cheese sooner
4. What to do with all the whey... we'll save that for another post!
Megan, I love reading about all your kitchen experiments. Very cool!
ReplyDelete